
Manufacture of cement tiles
A little history
From their invention around 1850 in France in Viviers in Ardèche, cement tiles proved to be a very interesting economic alternative to traditional tiles which at the time were then cooked or made of stone and marble, all very expensive.
The use of the hydraulic press made their manufacture simple and quick and reliable (hence their sometimes name "hydraulic tiles"). They were also shown at the Universal Exhibition in Paris in 1867.
The manufacturing method makes each tile a unique piece made by hand.

Main manufacturing steps
Mold cleaning
Color preparation
Placement of the separator
Casting of the surface layer
Divider removal and cement dusting
Filling with gray mortar
Switching to the hydraulic press
Unmolding
Air drying and storage
01.
Mold cleaning
Before each molding, the mold is meticulously and carefully cleaned using a scraper and a brush. Then the bottom of the mold is greased to facilitate unmolding.

03.
Placement of the separator
A divider which represents the patterns of the tile to be made, also called a separator, is placed on the bottom of the mould.
It has vertical partitions that form cells.

05.
Divider Removal
and sprinkling of cement
Once the mold is filled, the divider is gently removed, a second layer is added called brewing, of comparable thickness to the first, made up of a mixture of gray cement and sand. Its function is to absorb excess water from the first layer.

07.
Passage to the press
The mold thus filled is then placed in a hydraulic press which strongly compresses the whole.
Under the effect of the pressure, the excess water contained in the mold is evacuated.

02.
Color preparation
The colors are prepared prior to the manufacture of the tiles.

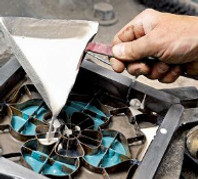
04.
Casting of the layer
of surface
The craftsman prepares colored pastes by mixing water, white cement, white marble powder, sand and pigments. These mixtures are poured into the compartments of the mold in such a way to form the chosen pattern. Its thickness is 2 to 5 mm.
06.
Filling with gray mortar
Finally, we finish filling the mold with gray mortar, 10 to 13 mm thick, which serves as a support for the assembly.

08.
Unmolding
The demolding is a very delicate step because the mold is dismantled and the tile is colored face on the base of the mould.
It must then be taken off without being broken or veiled.

09.
Drying
The cement tile taken out of the mold will be dried in the open air for 24 hours. Once the cement has completely hardened, the slabs are sprayed with water and kept in a damp room for 28 days.
